Lots of great design blogs to keep you busy!

Wednesday, October 7, 2009


Monday, October 5, 2009
Real Estate Photo Tips - Part 2
3. Turn off the TV: Buyers want to see the room, not what TV shows your family watches! When the TV is on in the photo, their attention is drawn to it first, not the room. In the living room, potential buyers want to see the size and shape of the room and whether it would work for their furniture –- having the TV on distracts them from this.
4. Check the reflection in any mirrors: You want to show the room, not a photographer holding up a camera. The bright flash in the mirror distracts viewers and takes away from the room. Even the most beautiful bathroom looks awful with a bright flash of light in the middle of it.
5. Don't just take random shots: The goal of real estate photos is to show off your home's best features. A random section of wall for no apparent reason doesn't help someone visualize themselves living in the home. Buyers want to see the home's significant areas. Show as much of the room as you can. In the bedroom, for example, don't show a close up of the bed and nightstand with a tiny piece of wall –- people aren't buying your bedspread, they're buying your bedroom. Get as far into a corner or doorway as you can and get as much of the room in the photo as possible.
When selling your home, it's important to plan your photos carefully. You want potential buyers to be able to see themselves living in your home and to want to tour it in person. Keep this list handy and use it to help you take pictures that show off your home's best features. Look at each photo and ask yourself: Will this picture SELL my home? If not, don't let it get online. A few extra minutes of planning can go a long way!
Click here for yesterday's tips!
Sunday, October 4, 2009
Selling Your Home - Taking Better Real Estate Photos
Thanks to online real estate listings, today's homebuyers are forming their thoughts about your home well before they even see it in person. With a few clicks of a mouse, potential buyers can see which homes they want to explore further, and which ones they want to avoid.
Since the shopping starts before the buyers even set foot on your property, it's more important than ever to make sure your real estate photos show your home at its best.
Here are a few simple (yet very effective) things you can do to improve the quality of your real estate pictures:
1. Clean & de-clutter: Hide the remote control and take the cell phone and keys off the countertop before you take your shots. Tables and countertops should be bare other than decor items. Take magnets, pictures and school calendars off the fridge. Remove any visible garbage cans and tissue boxes. In the washroom, hide room sprays and toiletries, and remove shampoo bottles from the shower. And don't forget to put the toilet seat down -- a simple but often overlooked step!
2. No people or pets: Your photos should have nothing but the room and its furnishings -- no people or pets allowed! While browsing a local website I was shocked to see the photo the homeowner had chosen to best show off their front hall. Your attention wasn't caught by the entryway, its flooring, wall colour or closet...but by the person peering in through the front door! Unfortunately this is a common occurrence -- I've seen many photos of kitchens with someone washing dishes and living rooms with someone watching TV or bending over to pet a dog. Good real estate photos have no living creatures!
Click here for tomorrow's tips!
Sunday, September 13, 2009
Kendall's Room - the Transformation is Complete!
Before:


After:


More pictures from the project are posted on my website: http://www.stylishsolutions.biz/Charitable_Makeovers.html
Thursday, September 10, 2009
Kendall's Room - The Countdown is On!!!
Stay tuned for pictures Sunday or Monday!!
Thursday, August 20, 2009
We're on TV again!!
It should be up for a day or so.
Monday, August 17, 2009
Kendall's Room: Quick Project Update
We're being interviewed by Eastlink News tomorrow afternoon (time to clean the house again!) so hopefully that will help publicize the project even more and get the last needed donations.
We've come up with some great ideas so I'm really looking forward to pulling everything together next month!
Sunday, August 9, 2009
More Uses For A Picture Frame
1. A small frame makes an easy key holder for the entryway. Remove the glass, frame a small piece of fabric, add a couple of cup hooks, and you have a cute place to hang your keys:

2. Similar to the key holder but with larger hooks (I used a cabinet knob for this example), a frame can become a place to hang jewelry. This one is missing the other knob (it was getting late and I was tired of frames at this point!) but gives you the idea:

You can also turn a larger frame into a simple tray by adding cabinet handles to the 2 short ends.
Friday, August 7, 2009
2 Uses For A Picture Frame
For some reason I always seem to have a lot of picture frames floating around, and I've noticed most of my clients do, too. Here are 2 super simple ideas for projects you can do with a picture frame and some fabric:
1. Frame a pretty piece of fabric (take out the glass first), and you have a quick bulletin board:

2. Frame a piece of fabric, this time leaving the glass in. Grab a dry-erase marker and you have a great whiteboard for messages (I tried a few different fabrics and found that this ultrasuede worked best - too much pattern interfered with the message):

Check in later for 2 more frame ideas!
Wednesday, August 5, 2009
Laundry Room Project - In Progress
One of my current projects is a laundry room. The client was tired of the old black & white wallpaper and didn't like the almond washer & dryer (but replacing them wasn't in the budget) - the white in the room really made the non-white appliances stand out,
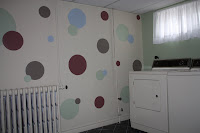
and not in a good way :)
She wanted something "more fun" (and also wanted a way to use up the rest of a gallon of BM's kittery point green).
There are still a few more things to finish up, but I think it's coming along nicely!
Subscribe to:
Posts (Atom)
