Congratulations to the winner - Vanessa at momsgotmanyhats! Let me know whether you'd prefer the candle holder or the wine rack and I'll get it set up :)

Saturday, December 12, 2009
Tuesday, December 1, 2009
My Very First Giveaway!!!!!
I'm super-excited to announce my very first giveaway!!
I was thrilled when the folks at diningroomsdirect.com offered to let me use one of their products as a giveaway...I easily spent an afternoon browsing through everything on their site (besides dining room furniture they have a ton of awesome accessories - it took me forever to choose!).
Being as indecisive as I am, I couldn't narrow it down to just one item, so they took pity on me and are letting me give you a choice between my 2 favourites:
a) Teak Tea Light Candle Holder or b) 7-Bottle Wine Rack


How to Enter:
You can get one entry for each of the following...
- visit www.diningroomsdirect.com then come back and tell me your favourite product
- become a follower of my blog and leave a comment on this post
- visit my facebook page and become a fan
- mention the giveaway on your own blog with a link back here (let me know in your comment!)
- mention the giveaway on Twitter (leave a comment here letting me know)
That's up to 5 chances to win one of these awesome prizes - what a great way to end the year!
Giveaway ends Friday, December 11, 2009.
Monday, November 30, 2009
Before & After - House of Bras
A bit of paint (deep purple and lime green) and some faux brick made such a huge difference! The store is much more warm and welcoming, and the new look really shows off their gorgeous merchandise.
Before:


After:


Monday, November 2, 2009
Finding Hidden Space in Your Home

To really maximize your space, look in places you normally may not think of.
Take advantage of space between wall studs to carve out a shallow display shelf. I did this in an upstairs hallway between two bedrooms. A narrow expanse of wall created an awkward space; centering a built-in shelf on the wall fixed the proportion problem and gave the wall a new purpose.
Try adding a shelf above a doorway (great for bathrooms – put some pretty baskets on the shelf to hold various toiletries while keeping them out of sight).
To make use of empty space under a window, try a low bookcase. Or build a window seat with a hinged lid for even more storage and seating options.
Many people have wasted space under their stairs that can be put to good use as well. This is a great place for built-in cabinets or shelving.
What hidden space can you find in your home?
Wednesday, October 28, 2009
Blog Party Time Again!!
It's Wednesday - which means it's time once again for the HOMEdigz blog party!
Check it out at www.homedigz.com
Tuesday, October 27, 2009
Quick & Easy Living Room Makeover

This client called me immediately after moving into their new home - the current wall colour did nothing for their sofa and they wanted to change it right away. The first thing I noticed when I walked into the room was the yellow-beige of the sofa vs. the pink-beige of the wall. An easy fix!

Wednesday, October 7, 2009
Monday, October 5, 2009
Real Estate Photo Tips - Part 2
3. Turn off the TV: Buyers want to see the room, not what TV shows your family watches! When the TV is on in the photo, their attention is drawn to it first, not the room. In the living room, potential buyers want to see the size and shape of the room and whether it would work for their furniture –- having the TV on distracts them from this.
4. Check the reflection in any mirrors: You want to show the room, not a photographer holding up a camera. The bright flash in the mirror distracts viewers and takes away from the room. Even the most beautiful bathroom looks awful with a bright flash of light in the middle of it.
5. Don't just take random shots: The goal of real estate photos is to show off your home's best features. A random section of wall for no apparent reason doesn't help someone visualize themselves living in the home. Buyers want to see the home's significant areas. Show as much of the room as you can. In the bedroom, for example, don't show a close up of the bed and nightstand with a tiny piece of wall –- people aren't buying your bedspread, they're buying your bedroom. Get as far into a corner or doorway as you can and get as much of the room in the photo as possible.
When selling your home, it's important to plan your photos carefully. You want potential buyers to be able to see themselves living in your home and to want to tour it in person. Keep this list handy and use it to help you take pictures that show off your home's best features. Look at each photo and ask yourself: Will this picture SELL my home? If not, don't let it get online. A few extra minutes of planning can go a long way!
Click here for yesterday's tips!
Sunday, October 4, 2009
Selling Your Home - Taking Better Real Estate Photos
Thanks to online real estate listings, today's homebuyers are forming their thoughts about your home well before they even see it in person. With a few clicks of a mouse, potential buyers can see which homes they want to explore further, and which ones they want to avoid.
Since the shopping starts before the buyers even set foot on your property, it's more important than ever to make sure your real estate photos show your home at its best.
Here are a few simple (yet very effective) things you can do to improve the quality of your real estate pictures:
1. Clean & de-clutter: Hide the remote control and take the cell phone and keys off the countertop before you take your shots. Tables and countertops should be bare other than decor items. Take magnets, pictures and school calendars off the fridge. Remove any visible garbage cans and tissue boxes. In the washroom, hide room sprays and toiletries, and remove shampoo bottles from the shower. And don't forget to put the toilet seat down -- a simple but often overlooked step!
2. No people or pets: Your photos should have nothing but the room and its furnishings -- no people or pets allowed! While browsing a local website I was shocked to see the photo the homeowner had chosen to best show off their front hall. Your attention wasn't caught by the entryway, its flooring, wall colour or closet...but by the person peering in through the front door! Unfortunately this is a common occurrence -- I've seen many photos of kitchens with someone washing dishes and living rooms with someone watching TV or bending over to pet a dog. Good real estate photos have no living creatures!
Click here for tomorrow's tips!
Sunday, September 13, 2009
Kendall's Room - the Transformation is Complete!
Before:


After:


More pictures from the project are posted on my website: http://www.stylishsolutions.biz/Charitable_Makeovers.html
Thursday, September 10, 2009
Kendall's Room - The Countdown is On!!!
Stay tuned for pictures Sunday or Monday!!
Thursday, August 20, 2009
We're on TV again!!
It should be up for a day or so.
Monday, August 17, 2009
Kendall's Room: Quick Project Update
We're being interviewed by Eastlink News tomorrow afternoon (time to clean the house again!) so hopefully that will help publicize the project even more and get the last needed donations.
We've come up with some great ideas so I'm really looking forward to pulling everything together next month!
Sunday, August 9, 2009
More Uses For A Picture Frame
1. A small frame makes an easy key holder for the entryway. Remove the glass, frame a small piece of fabric, add a couple of cup hooks, and you have a cute place to hang your keys:

2. Similar to the key holder but with larger hooks (I used a cabinet knob for this example), a frame can become a place to hang jewelry. This one is missing the other knob (it was getting late and I was tired of frames at this point!) but gives you the idea:

You can also turn a larger frame into a simple tray by adding cabinet handles to the 2 short ends.
Friday, August 7, 2009
2 Uses For A Picture Frame
For some reason I always seem to have a lot of picture frames floating around, and I've noticed most of my clients do, too. Here are 2 super simple ideas for projects you can do with a picture frame and some fabric:
1. Frame a pretty piece of fabric (take out the glass first), and you have a quick bulletin board:

2. Frame a piece of fabric, this time leaving the glass in. Grab a dry-erase marker and you have a great whiteboard for messages (I tried a few different fabrics and found that this ultrasuede worked best - too much pattern interfered with the message):

Check in later for 2 more frame ideas!
Wednesday, August 5, 2009
Laundry Room Project - In Progress
One of my current projects is a laundry room. The client was tired of the old black & white wallpaper and didn't like the almond washer & dryer (but replacing them wasn't in the budget) - the white in the room really made the non-white appliances stand out,
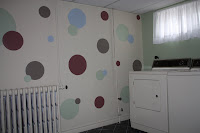
and not in a good way :)
She wanted something "more fun" (and also wanted a way to use up the rest of a gallon of BM's kittery point green).
There are still a few more things to finish up, but I think it's coming along nicely!
Friday, July 31, 2009
12 Ways to Use an Armoire

1. Laundry Station: A space for folding laundry as well as storage for detergent, fabric softener, and laundry supplies. You can even attach hooks on the outside and hang your folded up ironing board.
2. Gift Wrapping Centre: A flat surface for wrapping gifts and plenty of storage space for supplies - gift bags, kraft paper, tape, scissors, and greeting cards. Install long dowels on the back wall to hold your rolls of wrapping paper and ribbon. A birthday calendar on the inside of the door helps make sure you don't forget any special events.
3. Entertainment Centre: An excellent way to hide the TV, DVD player, video games, stereo, and their less-than-pretty wires.
4. Microwave Cart: In the kitchen, an armoire can hold your microwave, freeing up counter space. You can use the shelves and drawers for anything from cookbooks and tablecloths to mixing bowls and baking needs. Paint the inside of one of the doors with chalkboard paint and you have space for a quick grocery list as well.
5. Home Office: If you're short on space, an armoire can make an excellent home office – you get a work surface as well as storage for office files, supplies and paperwork.
6. Bathroom Vanity: If you have the space in your bathroom, an armoire with a mirror installed on the inside makes a great vanity – and the drawers are perfect for stashing towels, toiletries and cosmetics.
7. Bar: Perfect for mixing drinks and storing bar supplies – bottles, cocktail napkins, and garnishes. Screw a slotted rack into the top shelf for hanging stemware.
8. Baby Changing Station: Makes a great hide-away change table with plenty of storage space for diapers and accessories.
9. Linen Closet: If you don't have a linen closet, an armoire is a great place to store bedding and towels.
10. Jewelry Box: Have a lot of jewelry and accessories? Mount small hooks in rows along the inside walls for a great way to store necklaces and earrings. Scarves, rings, and hair accessories can all be kept in small baskets on the shelves or in the drawers.
11. Gardening station: Store your gardening pots, seeds and soil, and use the flat surface for potting and tending to plants.
12. Craft Station: A great place to store craft supplies with a flat surface for working on projects – scrapbooking, stamping, beading, cardmaking and more. Everything is within reach when you need it, yet easily hidden away when you're done.
Can you think of any other uses?
Monday, July 27, 2009
Awesome Project Update!!
CTV news is covering the room makeover project - we were interviewed this afternoon and it should air tonight at 6 (cross your fingers that no bigger stories come up to bump us!!).
Donation-wise, the project is coming along well - Timmins Decorating Centre is contributing the paint, and Home Depot is providing us with a closet organizing system, the wood to build my top-secret craft station, and new carpet. Some of the nurses at the local hospital have donated money to purchase craft supplies as well.
I can't wait until September when we put the room together!
Thursday, July 23, 2009
Quick & Easy Bathroom Makeover
 The main issue with this small bathroom: the client hated their bland colour scheme. Throw in a floor with pink undertones and a way-too-orange vanity, and the result is less than pretty. As the home's only bathroom it's always used by visitors, which made the homeowner cringe...she wanted a prettier room that wouldn't have her afraid to offer drinks to houseguests!
The solution? We started with a gorgeous shower curtain (Martha Stewart), then drew our other colours from that. Walls were painted a much more interesting red (Benjamin Moore's hot apple spice) and the vanity was painted out in davenport tan (now it's no longer the first thing your eye goes to when you walk into the room). The plain mirror was updated with wood trim - also painted davenport tan.
The result is a room the homeowner loves - done quickly and easily on a budget!

Tuesday, July 21, 2009
We made the newspaper!
The local newspaper ran an article about our project today!
A new bedroom for Kendall
When Designers Unlimited first formed, it was simply a place where women who own their own businesses could network and learn from each other.
Today, the group of seven local business women is putting its efforts into a very worthy cause.
A couple of years ago, the group redesigned a waiting room in the critical care unit at Timmins and District Hospital. Wanting to recreate that effort, the group poured its expertise in home design and art into the room of one special little girl.
Last year, seven-year-old Kendall Fountain's life changed forever when she was diagnosed with craniopharyngioma, a slow-growing benign tumour in the central part of her brain.
After contacting the Canadian Cancer Society, Designers Unlimited was informed of the little Timmins girl who was spending a lot of her time in a hospital being tested and treated for her illness.
Knowing that Kendall will be going through difficult times as she battles her illness, the group decided to try and brighten up a small portion of her life -- her bedroom.
After meeting with Kendall and learning her likes and dislikes, group member Heather Cote of Stylish Solutions put her skills to task and already has a design in mind.
"I know her favourite colour is pink and that she wants an area to do crafts and puzzles without the cat walking all over it," Cote said. "We want this to be a special place for her in which to recuperate and relax."
Kendall's mother, Carmen Fountain, said her daughter will soon be going into treatment. Carmen is looking forward to her daughter being able to enjoy her new room.
"It'll be nice for her to come home to the new room," Fountain said.
But Kendall will be just the first to receive a room makeover.
Cote said the group hopes to renovate a room every year for a child in Timmins with a serious illness.
At no cost to the parents, the group will come up with a design and do the work, while depending on local businesses to donate the needed items, such as paint, fabrics and bed clothing.
"We can't fix what's wrong, but we can do something to make them feel better while they are going through their ordeal," Cote said. "These kids are sick and we want to treat them to a nice place to play that's their own outside the hospital."
The children will be able to talk to the designers to ensure that the room truly becomes the dream room they've always wanted.
Cote started Designers Unlimited when she first moved back to Timmins and was working to start up her own business. Since then, graphic designer Denise DeForge, portrait artist Elaine McCurdie, photographer Julie Regimbal, window treatment and bedding creator Renee Bellavance, professional home cleaner Tina Green and Lisa Bryce, who specializes in event stationary and giftware and digital scrapbooking and genealogy, have joined.
"It started out with those in home decor, but we've expanded to include any woman in business," Cote said. "Still, everything pretty much compliments each other."
While work on Kendall's room is currently underway, the actual makeover is set to take place in September.
Saturday, July 18, 2009
Quick Painting Tips
 As much as I love choosing colours, I really dislike painting. I end up with paint in my hair, on my clothes, in the middle of the ceiling...
Here are a few painting tips to help the job go more smoothly:
When you remove your outlet covers and light switch covers for painting, tape the screws to the backs of the covers so you don’t have to look for them when you’re ready to put them back on.
Alternatively, you can use Ziploc storage bags - just put each switch plate and its screws into a small Ziploc bag, marking its location on the bag. (This also works well for curtain hardware.)
When painting a room, if you don't finish all in one day, just cover your roller with a tightly wrapped plastic bag or saran wrap, and put it in the fridge. When you take it out the next day it will still be wet and ready to go.
Thursday, July 16, 2009
Our project is underway!!!
Last night I got to meet the little girl who will be receiving our dream room makeover. I can't wait to get started - I was awake half the night thinking of ideas to create the perfect room for her! It's going to be a wonderful project for our group.
News releases are going out today, and we've started our search for materials and supplies (cross your fingers for us!). Throughout the project I'll be updating here as well as on my facebook page and website.
Here's a before picture to kick things off...

Wednesday, July 15, 2009
Don't Forget the Ceiling!

I love the look of tin ceilings, especially in older homes like ours...but the cost can be prohibitive. Luckily you can recreate the look with embossed wallpaper in a tin-panel pattern. Once it’s up and painted, it will look just like a real tin ceiling, but at a small fraction of the cost. (Side note: when hanging wallpaper on the ceiling, a third person comes in really handy. So does a heating pad – working overhead can really do a number on your neck!). A but more expensive but MUCH less work – 12” x 12” tin-style ceiling tiles. The result is the same, but it becomes a one-person job.
Sunday, July 12, 2009
Home Sweet Home
Back home after a week away visiting friends and family down in Southern Ontario. We had a great time visiting, sightseeing, Great Wolf Lodge, etc....and also got to see some great decorating ideas (yes, I'm a little obsessed)! I think the kids thought I was a bit nuts getting so excited over the decor in each of our hotel rooms (first time I've ever been in a hotel that had the walls painted something other than beige...our Barrie hotel actually had a mustard yellow accent wall!).
Also got to introduce the kids to one of my favourite stores from when we lived down south - Ikea. I behaved myself and only bought vases though!

Sunday, July 5, 2009
I love happy clients!!
A couple of weeks ago I was waiting to pick my kids up at school when a young girl walked up and introduced herself. Turns out the bedroom I had recently designed was hers, and she wanted to tell me how much she loved it!
"Thanks for picking out the stuff for my room - it's awesome! I love it! Thank you!"
It's so great to hear from happy clients! And my kids were quite impressed that Mommy is now what they consider "famous"...
Thursday, July 2, 2009
Quick & Easy Kitchen Makeover - On a Budget
 This kitchen had several things that bothered the homeowner (aka me!)...the previous owners had chosen everything they liked without considering whether or not they went together (they mostly didn't!). The biggest problem was the backsplash - the contrasting grout
 and the pattern on the tiles made the room look way too busy. Since a full kitchen makeover was being planned for a couple of years from now, all that was needed for now was a quick fix to make the room bearable for the homeowners who frowned every time we entered the kitchen.

Our quick and easy solution? A quart of paint (Davenport Tan HC-76) covered the backsplash and got rid of the busy lines, instantly making the room seem less cluttered. And a few $4 placemats were used to create a custom valance for the window.
Tuesday, June 30, 2009
Extreme Home Makeover - Designers Unlimited Style!
I'm thrilled to announce that my networking group, Designers Unlimited, has launched an exciting new project.
Some of you may remember our hospital makeover (if not you can check it out on our website: www.designersunlimited.ca). We had so much fun we've decided to make our charitable makeovers a signature event – each year we'll be doing a room to benefit a child with a serious illness. Our goal is to give them their dream room – a happy place to recuperate and relax.
Our first room project is getting started this month for a 7 year old girl with Craniopharyngioma. Over the next couple of months we'll be planning her dream room and hope to put the whole thing together in September. Stay tuned for details!
Monday, June 29, 2009
No, it doesn't HAVE to cost a fortune!
One of the biggest misconceptions about hiring a decorator is that it costs a fortune and you'll need to spend a huge amount of money - doesn't help when people have been told that their window treatment couldn't be touched for less than $700 (luckily they called me next and were quite relieved to have beautiful windows done for well under that price tag!).
One of my favourite things when it comes to decorating is seeing just how much I can do for the least amount of money. I love finding something that costs a completely unreasonable amount and recreating it for way less!
I while back I saw the most gorgeous artwork in a magazine...for $4000. Not even close to being in our budget. So I went to Walmart, grabbed some $3 canvasses, stopped off at the Benjamin Moore store to get a few testers...and threw this together:
 I even had a mom come to the door to ask about it one Halloween because she could see it through the window when she was taking her kids out trick-or-treating. Not bad for $50 and a couple of hours worth of work!
Welcome to my new blog!
After a lot of back and forth, I’ve decided to finally jump on the blog bandwagon! Once I get it figured out you can look forward to a ton of great decorating tips as well as a glimpse of what it’s like to run an interior decorating business in Northern Ontario.
Subscribe to:
Posts (Atom)
